Description + function
Dry floodproofing may be less disruptive and have less impact on the building because equipment doesn’t need to be relocated above the DFE.
There are two types of dry floodproofing: active and permanent.
Active measures require removable elements to be put into place before an anticipated flood. Permanent measures are fixtures and systems integrated into the structure itself, which do not need to be manually deployed in the event of an emergency.
Due to the risk of failure, FEMA does not recommend dry floodproofing the building exterior and openings for residential buildings. Dry floodproofing measures are not permitted for substantially damaged or substantially improved residential buildings. Dry floodproofing measures will not reduce an owner’s NFIP premium.
Effective dry floodproofing requires a design by a qualified engineer and an operations and maintenance plan, and should include:
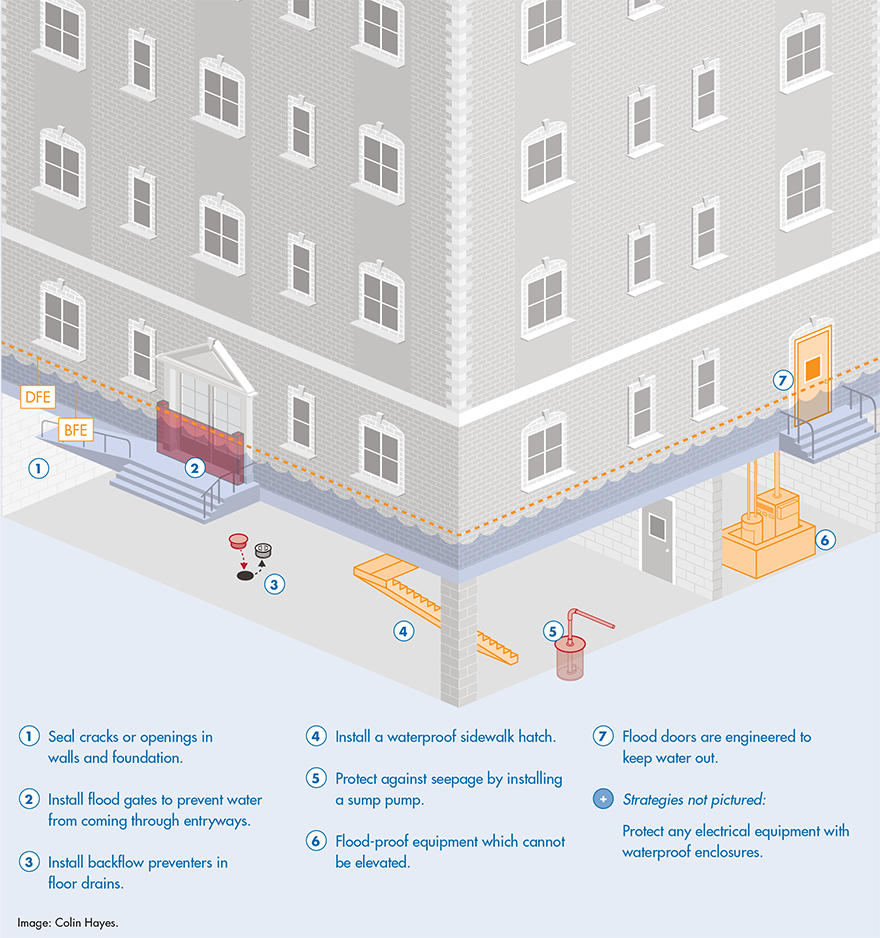
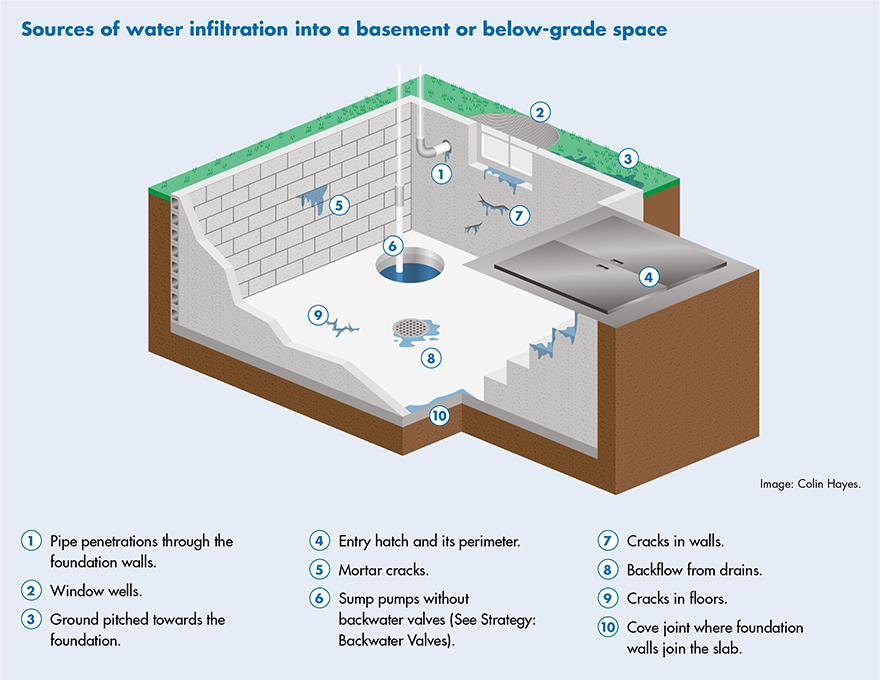
- Sealing cracks or openings on exterior walls or the foundation.
- Covering entry points below the DFE.
- Protecting against and remove seepage inside the building.
-
Protecting mechanical and electrical systems.
Strategy into action
- Seal all cracks and openings in exterior walls below the DFE.
- Install backwater control plugs in floor drains, and permanently seal floor drains that are no longer in use. Before anticipated flooding, sandbag floor drains.
- Obtain waterproof covers for vents and louvers located under the DFE and install them before an anticipated flood.
- Clean-out valve.
- The U-bend holds a reservoir of water that keeps sewer gas and odors from coming out of the drain.
- Before a flood event, the drain should be temporarily sealed.
- With an automatic backflow preventer, a floating stopper is pushed by rising water into the mouth of the drain, plugging it.

- Install sewer backwater valves (See Strategy: Backwater Valves). Cap house trap to prevent water from flowing into basement if sewer main is backed up.
- Install a sump pump at the lowest point of the basement (See Strategy: Sump Pumps).
- Protect electrical equipment which cannot be relocated with waterproof NEMA 6P enclosures.
Long-term.
- Permanently replace first floor doors with sealed-gasket flood doors and install removable flood gates over entry ways.
- Install waterproof hatch doors on sidewalk hatches. A trench drain at the base of the stairs can reduce seepage from a non-protected hatch.
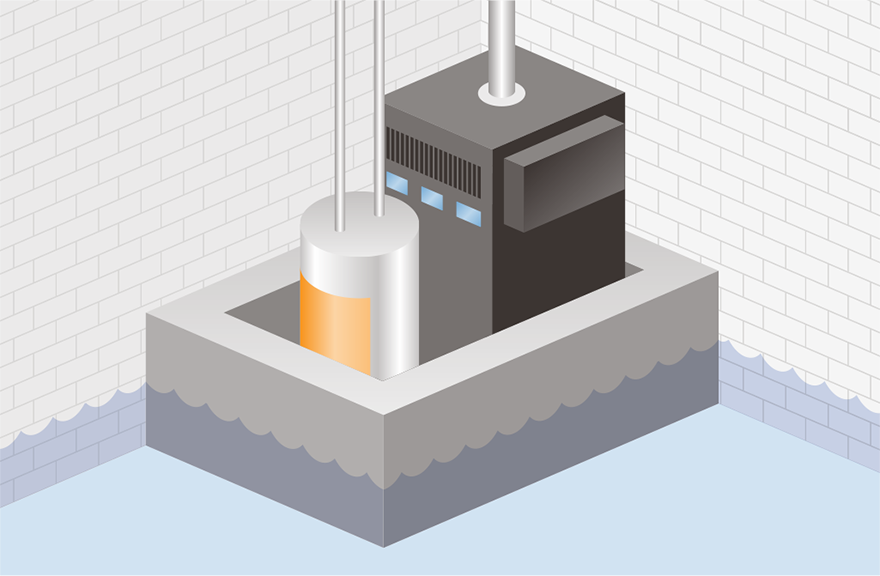
- If they cannot be elevated, critical building systems can be floodproofed by building a perimeter wall and allowing the rest of the space to flood (rather than protecting the entire building exterior). Due to hydrostatic pressure, these enclosures are recommended only for shallow floodwaters up to 3 ft.
 |
 |
|
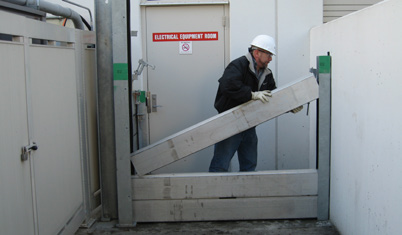
Flood gates protecting an entryway.
Image: Flood Control America.
|
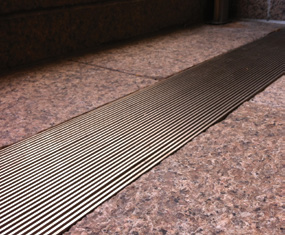
A trench drain.
Image: Samantha Yost.
|
 |
 |
|
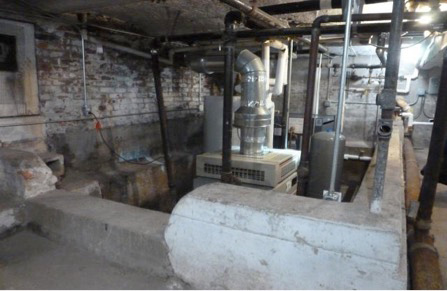
Dry component floodproofing is often an effective solution for equipment that cannot be elevated or relocated out of basements.
Image: MAP Architects, New York Engineers.
|
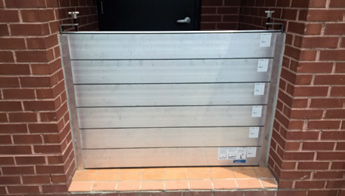
Because of hydrostatic pressure, component floodproofing barriers should designed to a maximum of 3 ft.
Image: Colin Hayes.
|
Operations + maintenance
It is vital to have an active operations and maintenance plan in place. Building staff should know how to properly install and operate temporary dry floodproofing measures before they are needed.
- Regularly inspect outdoor fixtures for signs of rust and corrosion.
- Inspect building areas below DFE for leaks, seepage and cracks.
- Install temporary flood barriers at entrances in advance of an anticipated flood event. Consult an engineer to see if this is a viable strategy.
Estimated cost
- $
- $$
- $$$
- $$$$
Supporting strategies
Resources
-
Can I Dry Floodproof my Building? CDM Smith.
www.floods.org/Files/Conf2015_ppts/F3_Perotin.pdf -
Dry Floodproofing: Selecting Appropriate Mitigation Measures for Floodprone Structures, Chapter 7, FEMA.
www.fema.gov/es/media-library/assets/documents/10618 -
Floodproofing Non-Residential Buildings, FEMA.
www.fema.gov/media-library/assets/documents/34270 - Reducing Damage from Localized Flooding, FEMA.
Background
The supportive housing facility at 318 Beach 85th St., Queens, NY, has 71 housing units operated by Services for the Underserved (SUS). It serves mentally ill and formerly homeless residents.
The building is located between Jamaica Bay and the Atlantic Ocean. During Superstorm Sandy, floodwater reached 4 ft. above the first floor, and the building lost power for a month. Total disaster-related costs from Sandy exceeded $4.6 million.
Strategy
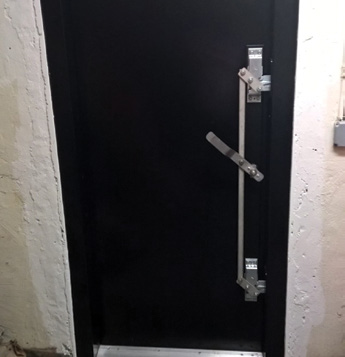
Four floodgates were installed in the building, two over the rear kitchen doors and two over the front doors. The floodgates vary in width from 40 to 54 inches, and offer an additional 24 to 36 inches of protection. In the basement, integrated waterproof flood doors replaced doors at two corridor entrances, a resident emergency exit and all utility rooms including the boiler room, electrical room, elevator room and fire pump room. The flood doors are designed to provide water protection to a height of 48 inches.
These retrofits were paired with other resilience measures, including the installation of sump pumps and a rooftop natural gas generator.
Cost
- Total cost including installation: $100,000.
- Four floodgates: $4,600.
- Seven flood doors: $56,700.
- Installation: $35,700.